Now this really was a BIG milestone. The engine is back in the chassis!
I've been building up to this since the day the engine was taken OUT of the chassis! Way
back then, my friend Richard - a fellow DS owner/ driver - had talked
me into pulling the engine out and had been around to help on the day
in question. Probably to make sure I didn't back out.  |
June 2015.......
|
 |
.....and a very recently removed engine.
|
Putting the engine back in is ideally a two person job, so a few weeks ago I contacted Richard and asked for his help. To be honest, I think he'd had have been offended if I hadn't asked him. He'd been there when I first tried to get the car running again. He'd been to see my car several times over the years and was watching my progress. I think this was almost as a big a moment for him as it was for me. With a date set, it had been a last minute rush to get everything ready in time, so that the job was as straightforward as possible on the day.
On the big day, I tied all the stray hoses and hydraulic pipes in the engine bay out of the way and similarly bundled up all the hoses and belts haning off the engine. I mentally 'walked' through the refit job for the umpteenth time.
 |
Patiently waiting for an engine
|
Richard arrived and after tea and some pleasentaries we addressed the 'elephant in the room' and got stuck in. With Richards help I used my trolley jack to move the car back out of the garage again, to give us some working room. With that done the car was lowered onto a pair of sturdy axle stands and the back wheels were chocked.
I
have seen engines put in from the side and from an angle at the front. I
planned to put my engine in from the front. Being a 1968 car, the front
cross member - the one that the horns fix to, and that the craking
handle is stored on - can be unbolted. Which gives improved access for
the reach of the crane. Leaving the car on axle stands instead of front wheels also
meant that it was more stable and a little easier to manouevre the engine
stand without the wheels getting in the way.  |
Getting nearer.....
|
I'd
even remembered to adjust the links of the chain holding the hook on
the jib so that the hook naturally sat in the right alignment to the
engine hook on the car's water pump body, and did not try to twist the
engine as we dropped it in. The engine was wheeled in front of the car and the crane attached.
 |
Nearly ready....
|
That's
when I remembered I needed to check the height of the rear engine
mounts! This has to be done with the engine weight on them (so before I
lifted the engine with a crane). I'd already made a template for
checking the heights and dug it out.
As my template helpfully reminds me, the procedure for setting the engine mount height is at Operation DX.133-0. That can be found in manual 518. However you can also find the instructions in volume 1 of manual 814. I used cardboard simply because it was easier to cut.  |
Dimensions for the tool to set the engine mount height
|
|
The instructions and tool dimensions are the same for manual and bvh cars. The measurement is meant to be made with the engine complete and in running order. My car didn't have a radiator fitted but being a bvh car had a centrifugal regulator and other parts that a manual car would not have. I decided it was just about as heavy as it was going to get and made the measurements.
Because of the design of my wooden engine stand, the engine had not been resting on it's front engine mount - it had been propped under the gearbox. Using the crane and a lifting strap, the gearbox was lifted by its cross beam. The tool was applied and the top nut and lock nut adjusted to give the desired heights. Like this.
 |
Using the tool to check and set the engine mount height
|
Given
my recent worries over the hydraulic seals in my engine crane, the engine was gingerly lifted a
few inches from it's trolley and we put the kettle again and waited to see
what happened. |
'Make or break' time - quite literally....
|
There was no obvious sagging while we were away and so the engine was lifted higher and it's wooden trolley removed.Slowly and nervously the engine was introduced to the car: "hello engine.....". "Hello car.....". I took a few photos but manouvering the engine and raising it/ lowering at the same time took both our efforts.  |
I just KNEW Richard would be pleased to help.....
|
With the crossmember in the engine bay removed, and the engine crane jib at half-stretch (it's 'half ton' postion) there was *just* enough room to manouvere the crane so that the engine was where it needed to go.I man-handled the engine in to place while Richard lowered the crane arm inch by inch. Worried
that my engine crane would suddenly fail, I was keen to get this over
and done with as soon as possible, but several times we had to raise the
engine and respoistion it before moving it into place again. I was surprised at just how little spare room there was around the engine: there was a matter of millimeters to spare between the engine and the gear brain. 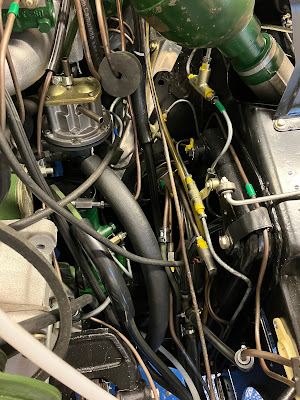 |
How does it all manage to fit!
|
I
was also surprised at the angle at which the engine slid in - the
timing chain end had to be held down at an angle for the engine to slip
under the scuttle. But at the same time it had to be high enough for the
exhaust down pipe to clear the bar across the bottom of the engine bay.
With some nervousness the pressure in the engine crane was reduced just enough to lower engine an inch at a time and - suddenly - it was in. We
lifted the weight of the engine again and made a micro-adjustment to
line up the number four spark plug hole and bolt holes for the engine mounts. With
great relief we moved the crane out of the way and bolted the engine
down.
The rear engine mounts needed several wobble extensions on the ratchet to navigate the necessary angles to bolt them in place. We tried to fit the drive shafts to the gearbox output housings but found that we couldn't reach the expected torque setting on about half of the twelve bolts. It was clear that threads were being stripped somewhere. Removing one of the bolts we found a delicate curl of sharp steel.
 |
The thread from a stripped nut! (and a bag of replacements)
|
This was the thread stripped from the nut! We did up as many as we could for the moment but I will probably order some new nuts. With some old tyres fitted the car was wheeled back into the garage.
The kettle went on for a celebratory tea and we spent our time admiring Richard's car and making under-bonnet comparisons.  |
Richard's (1972?) DSpecial
|
If I'm honest, and after many years of wondering about what this day would be like, my thoughts were never far from the milestone we had just achieved with my car and the next phase of jobs it now enabled, and I imagined my car being parked up on the drive way in the not too distant future.


